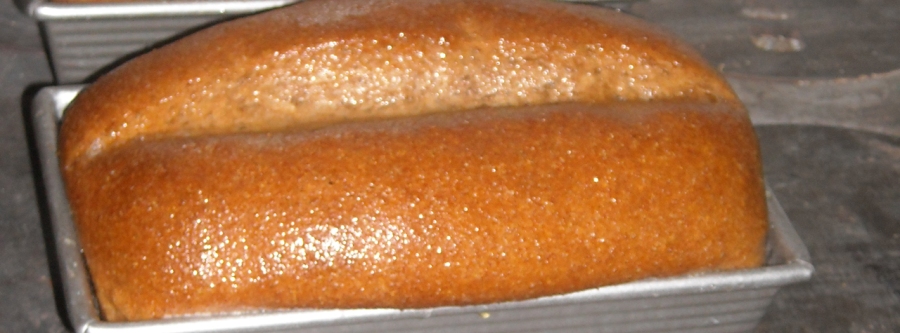
Okay everyone, I am now entering a zone which is a passion of mine; Baking Bread! Those who know me well understand that I am a good cook, but baking is a challenge for me. It’s because of all the details and measurements… I love to experiment and cooking is my creative outlet — hence, baking, with its precise recipes is more of a challenge. But… I LOVE a challenge! So, from a non-baker, here is a true “how to make” the most extraordinary recipe for soft, lightly sweet, simple, nutritious, inexpensive, adaptive, Honey Whole Wheat Sandwich Bread!
We have moved to multiple states and have lived at sea-level and at high altitude. I wanted a great stand-by recipe that could perform well no matter where my family lived. As many bakers know, a versatile recipe is difficult to create without problems such as the bread not rising, or turning out too dry or too wet, or not baking properly. This Honey Whole Wheat Sandwich Bread is wonderful. You will never again buy a sandwich loaf of bread from the grocery store.
For homesteaders, we prioritize quality verses quantity. Pleasant Hill Grain is my go-to place for high-quality baking tools. Utilizing cook’s tools and baking ingredients from Pleasant Hill Grain will make your bread baking experience better; these tools are so well made that they’re sure to last a lifetime. Well-priced quality products, excellent customer service and no knock-offs make Pleasant Hill Grain my smart baking source.
I will be holding a contest with this article. If you “like” this article, and live in the United States of America, you will have a chance to win 100 bread bags and a bench scraper from Pleasant Hill Grain!
Honey Whole Wheat Sandwich Bread
(Makes 2 Loaves)
INGREDIENTS
6 cups of Whole Wheat Flour
2 3/4 cups Water
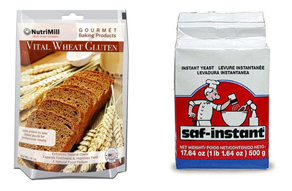
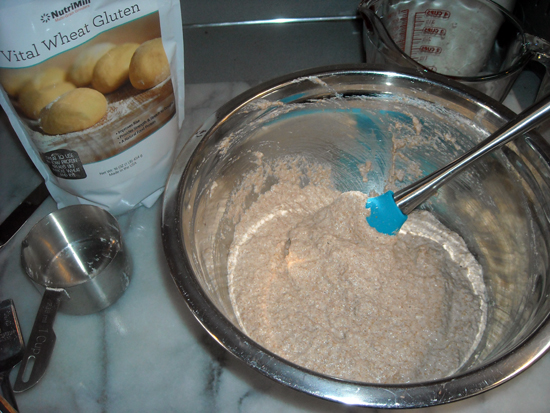
7-1/2 tsp of Vital Wheat Gluten
1/4 cup Honey + 1 tbsp
3 tbsp Butter + 2 tbsp
1 tsp Salt
2-1/4 tsp Instant Yeast
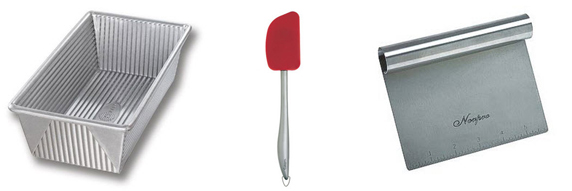
ESSENTIAL TOOLS
Mixing Bowl
Bread Pans
Bench Dough Scraper/Divider
Spatula
HOW-TO INSTRUCTIONS
Step One: The Soak (1 1/2 hours)
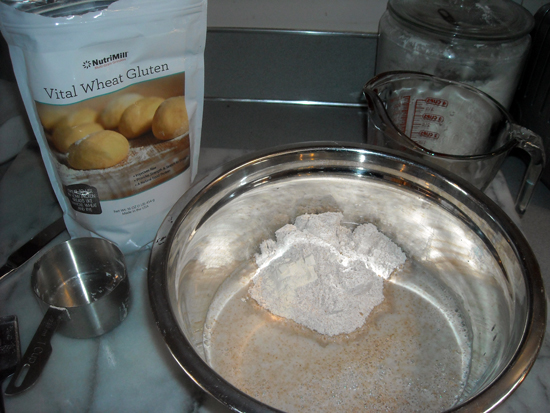
In a mixing bowl, mix 3 cups of whole wheat flour, 3-3/4 tsp of Vital Wheat Gluten and 2 -1/2 cups of water (filtered or well water, no bleach in water). If you are using freshly ground whole wheat flour, decrease water to 2-1/4 cups. Vital Wheat Gluten provides your dough with the necessary protein structure, giving it the ability to rise well. Cover the mixture with a damp tea towel. Let this mixture soak for 1 1/2 hours.
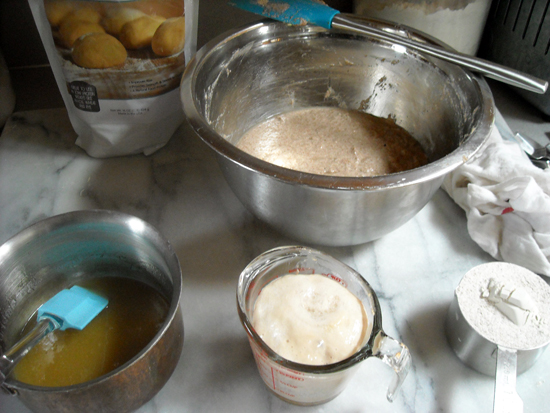
Step Two: Make the Sponge and Prepare the Salt, Honey and Butter (1/2 hour)
After the soak, fill a measuring cup with 1/4 cup of lukewarm water, 2-1/4 tsp of Instant Yeast and 1 tbsp of honey. Lightly mix a few times until the yeast particles are hydrated. After 1/2 hour, the Instant Yeast should be very much alive and bloom up the measuring cup’s side. Melt the butter, salt and honey together. Set aside to cool to room temperature.
Step Three: Mix In Remaining Ingredients (15 minutes)
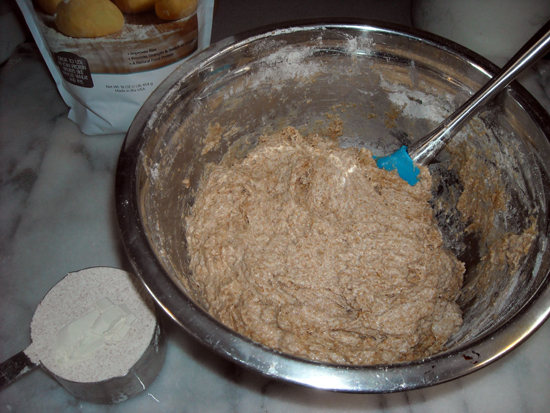
After the flour has soaked and the sponge has bloomed, add the butter, salt and honey mixture. Stir to combine. Add 2 cups of whole wheat flour and 2-1/2 tsp of Vital Wheat Gluten to the dough. Stir well to thoroughly combine; stir first until it becomes too difficult to stir, then turn out the dough onto a lightly flour dusted surface and knead together. Add remaining 1 cup of whole wheat flour and 1-1/4 tsp of Vital Wheat Gluten gradually until you reach the right consistency. What is the right consistency? The dough should be fully combined with all the flour hydrated. Dough should be slightly sticky; touch with your fingertips-lifting up, the dough should pull up and quickly release, springing back into place. Dough should be pliable and not stiff, dry or too sticky. This last cup of flour along with the Vital Wheat Gluten is what makes this recipe so versatile. We live in a wet environment and almost always need the full cup of flour. Your environment will probably be different. Clean out your mixing bowl and grease it.
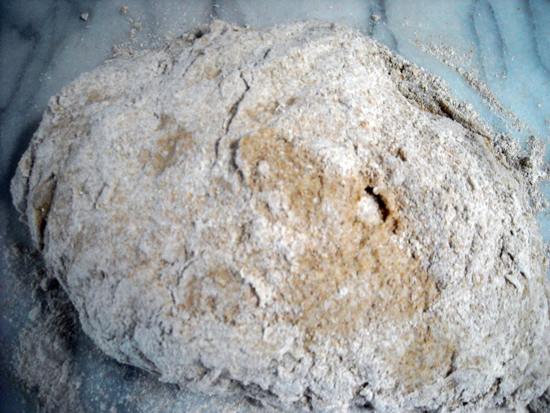
Step Four: Kneading the Dough (20 minutes)
Add a dusting of flour to the surface then you knead the dough for 15 minutes. Turn on the timer.
How do you knead dough?
- With both hands press down on the dough, flattening it.
- Turn the dough 90 degrees
- Slap the dough, fold it over
- Repeat!
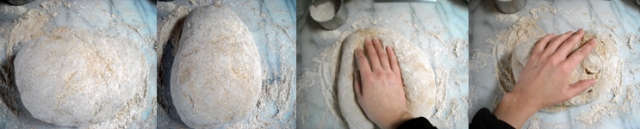
Form the dough into a ball and place into the greased mixing bowl. Cover the bowl with a damp tea towel.
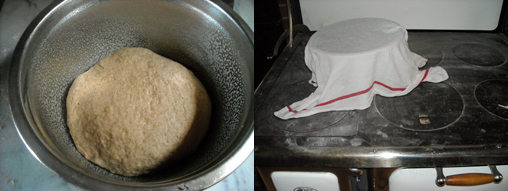
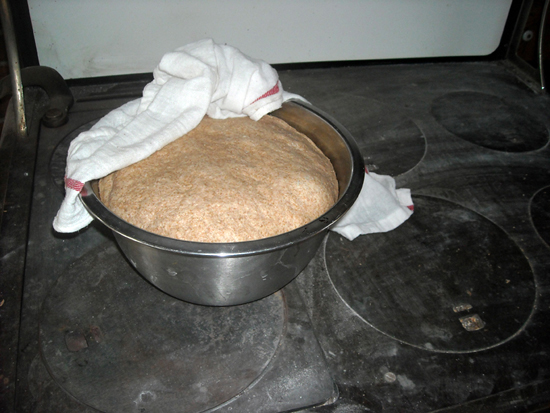
Step Five: The Rise (1 hour – 4 hours)
Place the covered bowl of dough in a warm place in the kitchen. Let it rise to the point that it has doubled in size. How long this takes depends mainly on how warm your warm spot is. Altitude also can have an effect on how long the dough takes to rise.
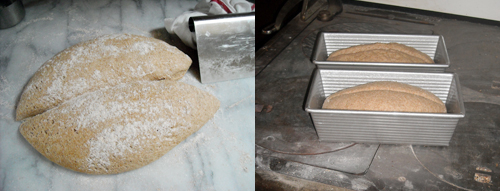
Step Six: Make Loaves and Rise Again (1 hour)
Punch down the dough. Knead the dough about five more times. Divide into two even loaves with your bench scraper. Form each dough half into a loaf. Place in greased bread pans. Cut the dough down the center at a ¼” depth. Cover with a damp tea towel. Let the dough rise again in a warm place in the kitchen for about an hour. When the dough has doubled, or is getting close, preheat your oven to 350o F.
Step Seven: Bake the Bread (40 minutes @ 350o F)
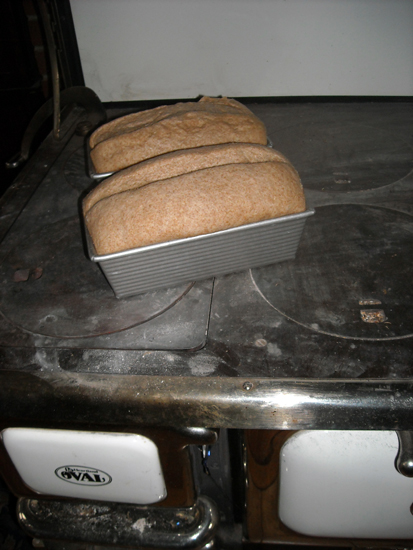
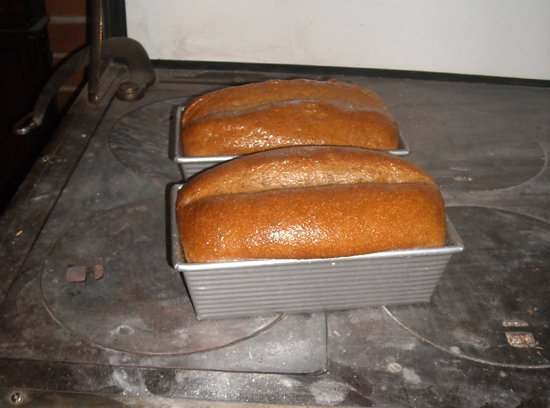
Once the loaves have doubled in size and the oven is preheated to 350o F, place the loaves into the oven to bake. Let them bake for 40 minutes until the tops are golden brown. Once baked, take them out of the oven to cool on the stove top. Melt 2 tbsp of butter and brush the tops of the loaves with the butter. This will ensure the tops are tender and pliable, not to mention delicious. Let the loaves cool then remove them from the bread pans. Slice and enjoy! Any left overs should be stored in a bread box, a bread bag or in the fridge.

This is nice wheat sandwich! Thanks for sharing 🙂
LikeLiked by 1 person
Pingback: Honey Whole Wheat Sandwich Bread – SEO
Pingback: Honey Whole Wheat Sandwich Bread — How to Provide – Suman Freelancer
I’m going to try this. Unfortunately, pretty much all of my loaves (from other recipes) are all way too dense. I can’t seem to get a handle on fluffy. Ugh.
LikeLiked by 1 person
Give this a whirl! 😉
LikeLiked by 1 person
I wonder if one could mix it in a stand mixer with a dough hook. It sounds delicious.
LikeLike
You sure could! 😉
LikeLiked by 1 person
Thank you for the great pics. Makes bread making a little less daunting! 🍀
LikeLiked by 1 person
Sure, I seriously love this recipe and the bread is fantastic. I hope you enjoy.
LikeLike
This looks great. I just started baking and I love the recommendation for good baking products.
LikeLiked by 1 person
Wonderful, it’s so nice to see folks still interested in homemade bread. My next bread adventure is sourdough starter.
LikeLiked by 1 person
Reblogged this on Recipe Dreams and commented:
Looks amazing, can almost smell it!
LikeLike
I keep trying to make bread and it’s always a fail. I’m not sure what I’m doing wrong but I’ll keep trying. Sometimes it doesn’t rise and sometimes it’s as hard as a brick but I’m stubborn enough to keep going at it.
LikeLiked by 2 people
Keep going and give this recipe a whirl. Really the Vital Gluten is the key… It is your insurance policy.
LikeLiked by 1 person
Question with bread baking-what would be considered too warm or not warm enough while letting the bread rise?
LikeLiked by 1 person
Great question! In my home, there are hot and cold spots during the winter. We have our wood burning oven going 24/7, giving off a low heat. On the oven, it is about 80-90 degrees F. I place the rising bread off to the side or in the warming box. This gives me a slow and steady rise. Professional proofing boxes have a temperature of 90-100 degrees. Sooooooo anywhere from 80-100 degrees is great! 🙂
LikeLiked by 1 person
Oh geez, maybe that has been part of my problem all along. Every recipe says “a warm place” but I had no idea of what they meant by warm. Now I know, thanks for explaining, maybe I could turn my oven on to 100 til it heats up then turn it off and place the dough in there while rising??
LikeLiked by 2 people
Possibly, but most stoves have a minimum temp of 170 degrees F… You might heat your stove and place the dough to rise on the counter next to the stove?
LikeLike
Okay I’ll try that. I gonna try this recipe this weekend.
LikeLiked by 1 person
Pingback: Baking Day – Let's Face the Music
🙂 Love it!!! Enjoy!
LikeLike
Pingback: Progress on the 101 in 1001 – Let's Face the Music
😉
LikeLike
I justed started getting into bread too: post timing is perfect for me 🙂
LikeLiked by 1 person
That’s great! You’ll love this recipe. It is absolutely delicious. Pick up Pleasant Hill Grain’s Vital Gluten. It is worth it!
LikeLiked by 1 person
Eeeek, I wonder if they ship to Canada. Thanks for this info, I can also try to find some here if all else fails 🙂
LikeLiked by 1 person
😉 You sure can order through Pleasant Hill Grain – via the phone: 800-321-1073 https://pleasanthillgrain.com/ordering
LikeLiked by 1 person
Beautiful looking bread 🙂
LikeLiked by 1 person
😉
LikeLike
Your bread looks so nice and the photos are beautiful. I pinned one of the photos!!
And thank you for following Khadija is in the Kitchen.
All the best to you
Khadija
LikeLiked by 1 person
Khadija, thanks so much for your kind comment! 😉
LikeLike
Will this recipe work in a bread machine? Thanks.
LikeLiked by 1 person
I’ve never worked with a bread machine…. Hmmmm is there any info on the web about converting bread recipes?
LikeLike
I also struggle with baking, but am an excellent cook. All that measuring, it scares me! I think its physically impossible for me to level out a measure.
I have been tempted to try my own bread, but just haven’t gotten around to it yet!
Your loaf looks great!
LikeLiked by 1 person
Melissa, you seem very similar to me! Try this recipe, it will not fail you. Try the bread pans from Pleasant Hill Grain. These pans are the best! Also, you can add up to 1 cup of various grains, seeds, dried fruit or nuts to the bread when you add the extra flour — if you like to experiment. 😉
LikeLiked by 1 person
They look great. I used to get bread to rise by putting it in a cold oven with a hot water bottle. cheap and effective.
LikeLike
Your bread loaves look amazing and your recipe sounds so simple to do BUT…OMW, bread scares me. I don’t know what it is, maybe the kneading, scared I will knead too much then it will be tough…don’t know. But, saying that, Bread is my mission this year to bake, so I will pin this and make your bread !!! I must just check out and do some research on Vital Gluten, as I don’t recall seeing that around. Have a great week further. 🙂
LikeLike
Bread is beautiful! Good job!
LikeLiked by 1 person
🙂 Thanks!!!
LikeLike
Beautiful bread! We haven’t bought bread from the store in a while! I think we love the taste of homemade bread too much. 😊
LikeLiked by 1 person
I agree, homemade is so much better!
LikeLiked by 1 person
Wonderful bread recipe.
LikeLiked by 1 person
Thanks Jovina!!! 😉
LikeLike
They look delicious!
LikeLiked by 1 person
Lovely bread thank you for the recipie can’t wait to try it !
LikeLiked by 1 person
Curious: Why do you use so up much vital gluten in this bread? I make sourdough loaves weekly and add no vital gluten. How is the crumb in your recipe?
LikeLiked by 1 person
I am in mild altitude. The vital gluten ensures a great rise and tender crumb. 😉
LikeLike
Ahhh. Good to know. I live in the Pacific Northwest and probably no more than five feet above sea level. 🙂
LikeLiked by 1 person
Also, bread recipes which contain 100% whole wheat have difficulties rising. the vital gluten is your insurance policy! 😉
LikeLiked by 1 person